Tutorial: Deploy a Convector solution
Are you just getting familiar with Forma and want to understand how to deploy your solution with Forma? This tutorial is great for you then. Also if are just getting started with a Trial this is the right tutorial to follow.
Overview
In a nutshell, you can communicate with Forma to operate the network, and to the Forma created network to consume the blockchain.
In this tutorial, we will use an existing code base of a fiction project to issue certifications and attributes to citizens.
The project includes:
- The smart contract created with Convector.
- The back end server that communicates to the smart contract and the World State (CouchDB).
- Front end server.
By default, you can access a Network created with Forma from anywhere in the world. In this tutorial, the server and the frontend will reside in your own computer whilst the network resides in the cloud.
Beware that this testing project is a Convector project, however, it's not mandatory that you develop in Convector to use Forma. Forma works well with native JavaScript smart contracts as well as Golang smart contracts. And the backend can be built in any programming language you'd like as well.
Download the code base 💻
We will use the same code that is created by this Convector tutorial but with a modified and more extended code base.
Make sure you meet Hyperledger Fabric's prerequisites here.
Go to your preferred command console and run the following.
# Download the code base
git clone https://github.com/worldsibu/convector-example-people-attributes
# Enter in the folder with the code
cd convector-example-people-attributes
# Checkout a branch with UI and advanced multi-user features
git checkout feature/full
git pull origin feature/full
# Install dependencies
npm i
# Package the code to get it ready for Forma
npm run cc:package
Once the code has compiled successfully you need to compress the resulting JavaScript code into a Zip format.
We will take that zip and upload it to Forma.
Create your testing Network
For this tutorial, we will use a Developer Network (with a Ghost organization) when creating a network, therefore, it will be a 2 organizations network that will have all proposals you make immediately approved (creating ledgers, installing or upgrading smart contracts, etc).
Log in to Forma and let's create a network: forma.worldsibu.com.
From the home page, click the button New network and let's use the name DevNet for our network.
Please, choose to use our fully hosted plan (Fully managed by WorldSibu) so you don't have to create a Kubernetes cluster yourself.
And in the Ghost Organization field input Gov to emulate a government organization.
Once you submit the proposal, you'll see it is pre-approved as we are using a Ghost organization.
Click on I agree and then Deploy. It will take a few minutes to deploy all the blockchain components for you, but don't worry, you'll get an email once it's all ready for you.
👏You officially created your first network with Forma!
Upload the smart contract
To upload the code, the process is quite simple:
- You create a proposal filling a form and uploading the Zip with your code.
- In this case, the proposal will be pre-approved too.
- Click on Deploy.
- Wait a few seconds.
From your Home page, enter into the default ledger created for you and create a new Smart Contract.
|
|
|
|

Now in the form, make sure to put the following values and to upload the right Zip file.
Make sure your Zip includes all the code in the root, not in a subfolder.
After creating proposing the smart contract, you'll see a proposal pre-approved. Just click deploy and after a few minutes, you'll see the smart contract is ready for use.
Voilá! You deployed your first smart contract to Forma. Easy, right? 🤓
Setup the server in your computer to connect to your Forma network
Now, let's create some seed data with some helper libraries that the code that you downloaded before has.
Here are a few things we will do:
- Create 3 service accounts (identities/users). These accounts will need special names, so we will detail how to do it later in this tutorial.
- Download a network profile with the addresses to the blockchain.
- Enroll the service accounts to get their certificates.
- Mock some data in the blockchain (enroll the service accounts we created before).
- Start the server with these identities and test!
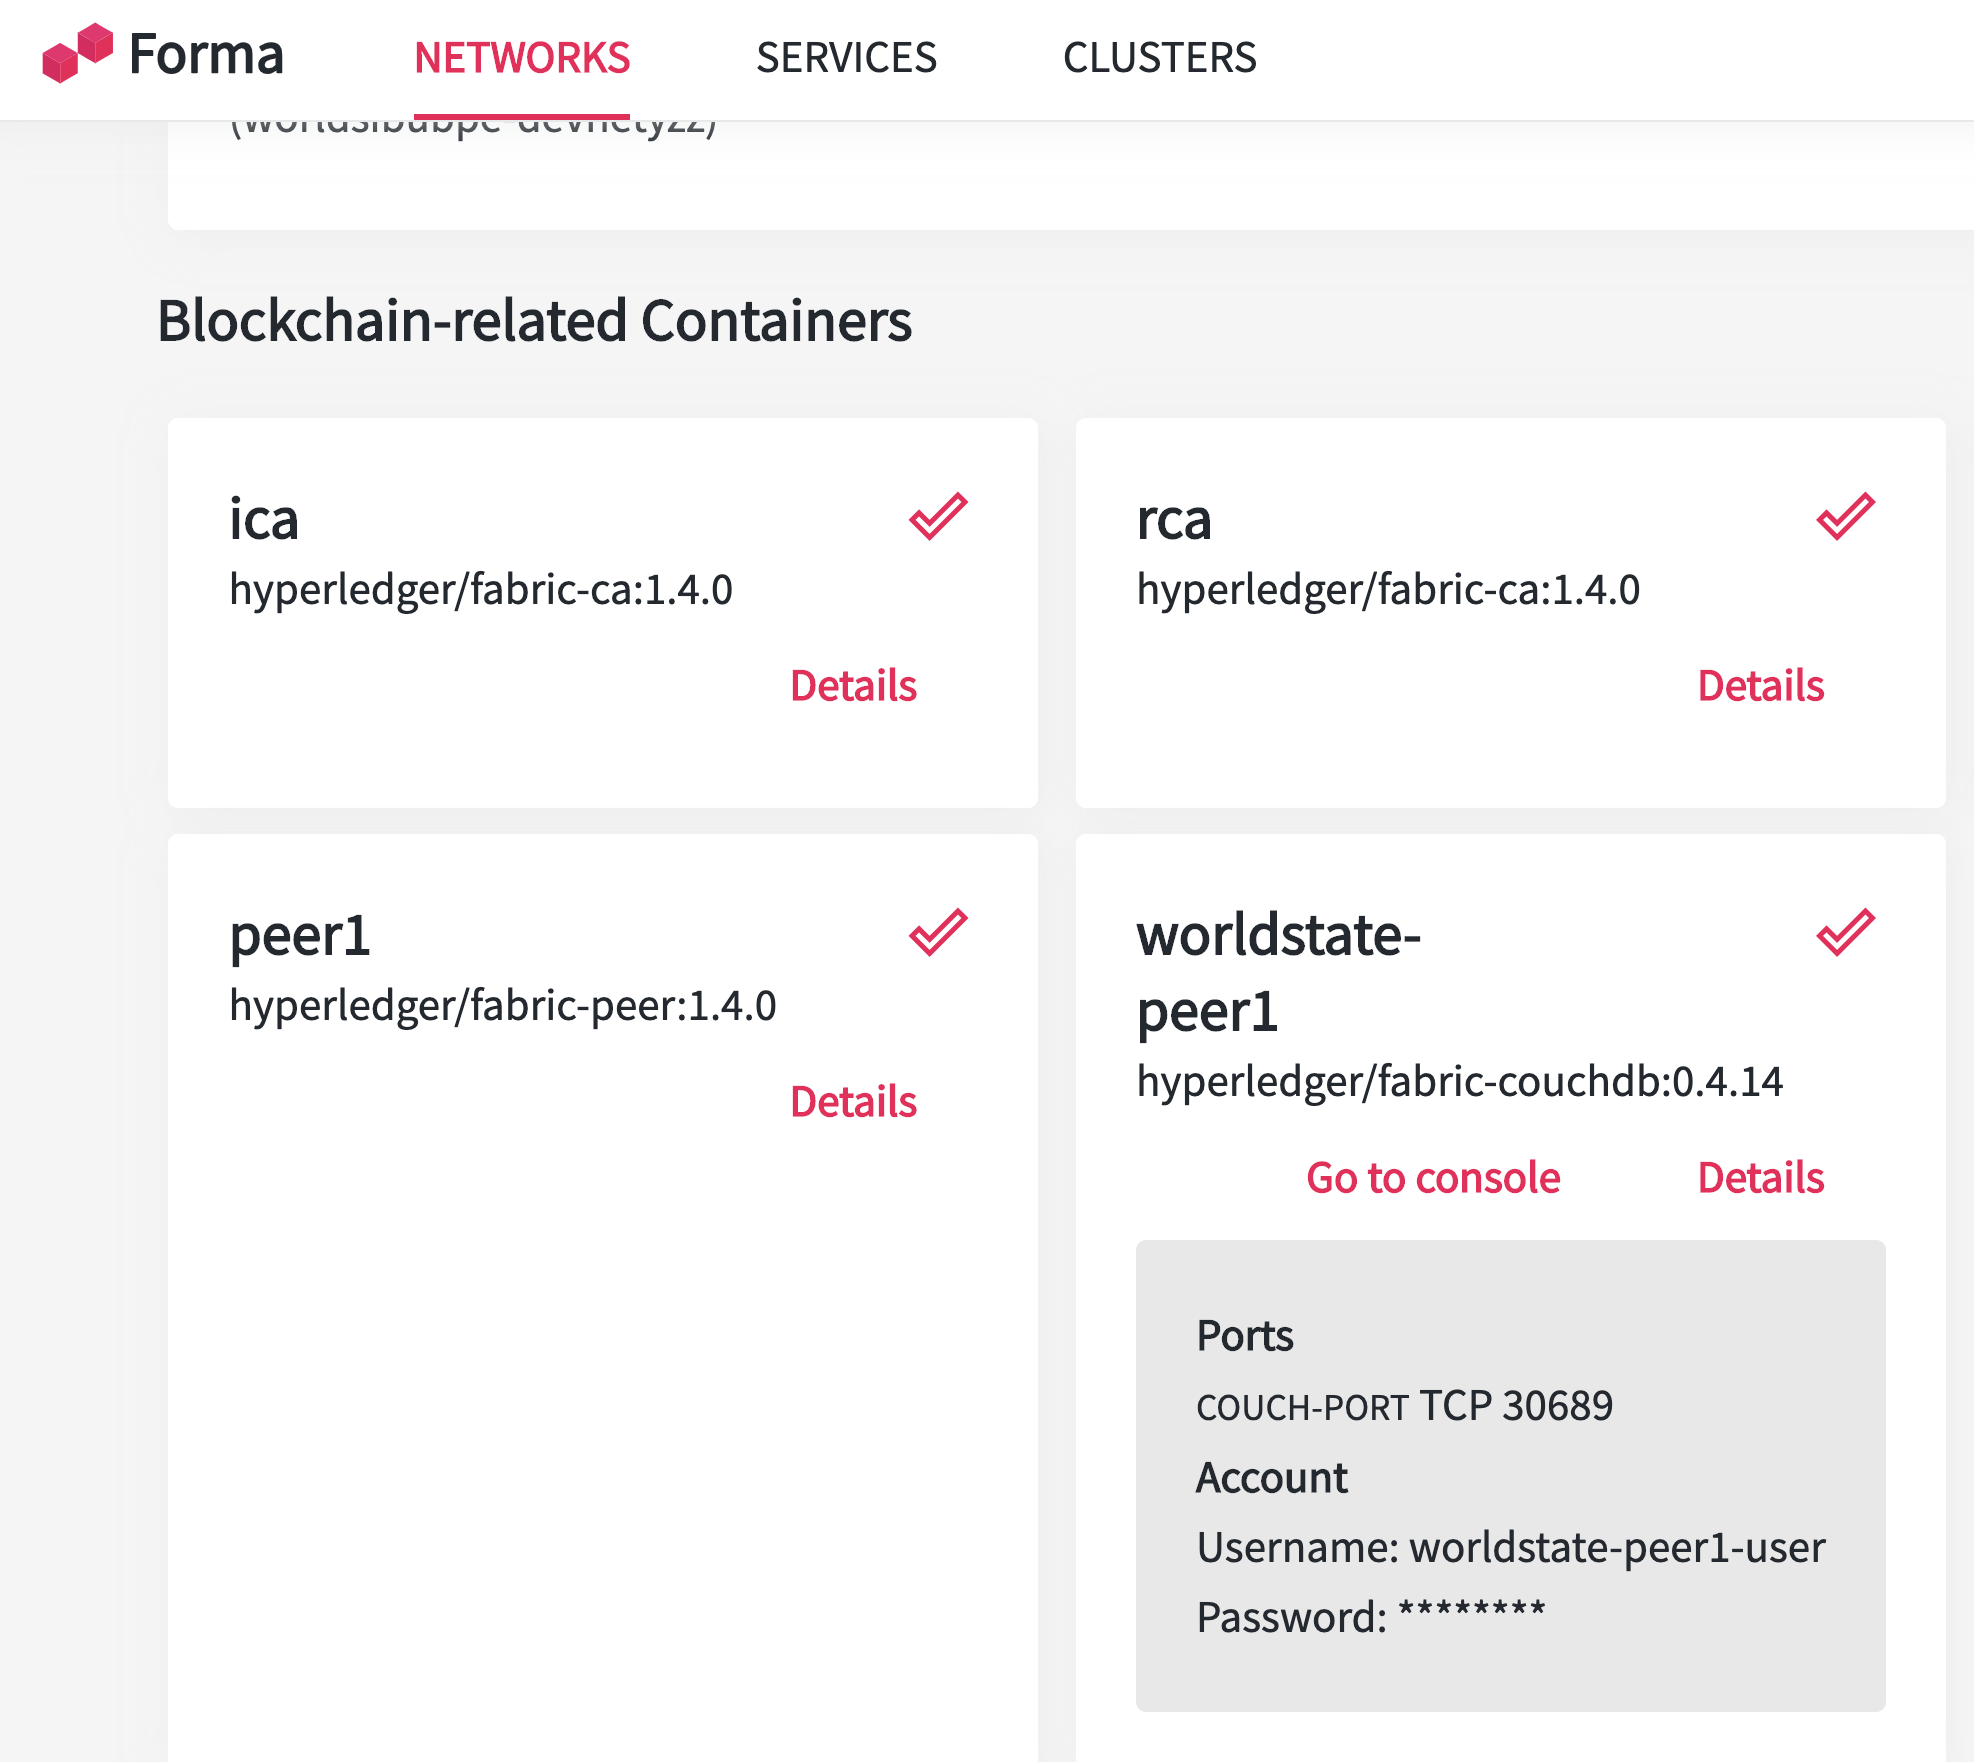
Head back to the home page and click on Your nodes environment and identities to access your environment for that network.
There you can see all the containers related to Forma, the address of the cluster where you are running (which will be needed for enrollment), and a section to create Service Accounts.
Go to the source code you downloaded previously and edit the .env file inside of the ./packages/administrative package, and replace the <server> and <port> fields.
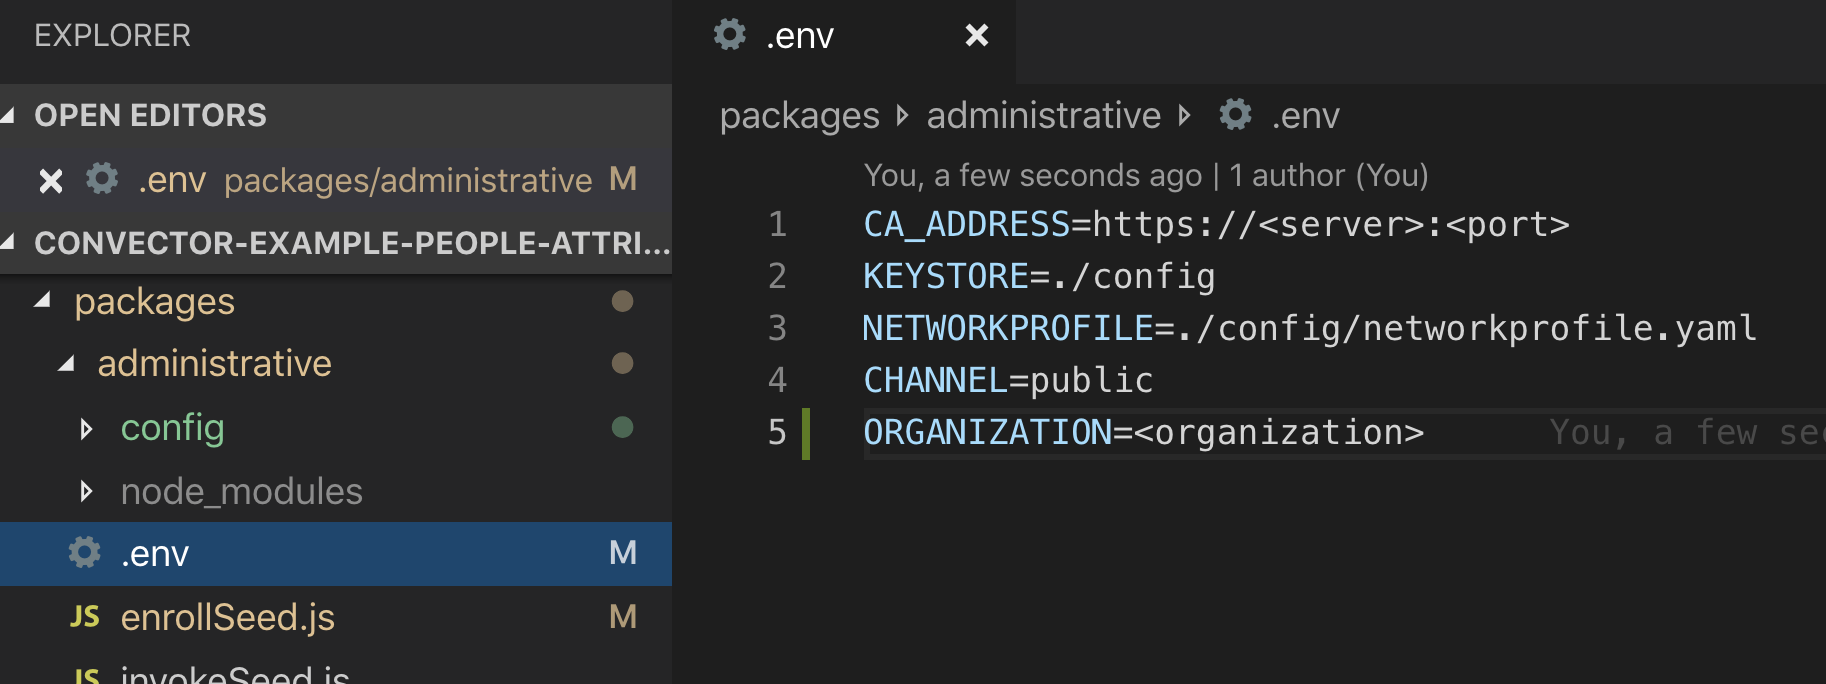
With these ones:
So your CA_ADDRESS field will look something like this: CA_ADDRESS=https://c-prod001.worldsibu.com:30681
Also, replace the <organization> field with the one under your Network's name. In the screenshot it's the field: worldsibubpe-devnetyzz. Yours will be different.
Next, we have to create 3 identities ( Service Accounts) for the demo to work. Click New service account on that same screen and fill the form 3 times (username and password fields):
- Government User:
- Username: gov
- Password: EEEaa123
- University 1 User:
- Username: mit
- Password: EEEaa123
- Company 1 User:
- Username: naba
- Password: EEEaa123
Make sure you are setting the right password, as we will need it to enroll the user later. You can, of course, later create new users with any name or secret that you want, but for this tutorial, we will need these values.
Once these are ready, let's enroll them.
We will need the network profile for that network for the public channel, so in any of the users you created, select the Project public and download the network profile.
The network profile is a yaml file that tells the server where is the blockchain and how to communicate with it.
Open the yaml with your text editor and change the values in the credentialStore section for the value ./config.

Copy that yaml file and save it in the folder ./packages/administrative/config with the name networkprofile.yaml.
Ready to get the certificates of these service accounts? Run npm run forma:seed:enroll from the root of the project.
You'll see a group of new files, these are your private keys to access the network and sign transactions!

Now let's create some seed data for the network!
You'll need to run, again from the root of the project, npm run forma:seed:data
This will use all the users we created previously and register them in the smart contract so that they exist as identities for the use of your business logic.
The first transaction may take a while, as it is "waking up" the containers for the smart contract.
Start the server and the UI and play around with it
Now that you have some network participants registered, the server will work and will let you create some people and assign attributes to them!
Since that example code was made to run with Hurley you'll need a few changes in its configuration.
First, create a .env file in the root of the server folder. Inside of it, you will need a few values (copy and paste these contents into your new .env file and replace the ones you have to replace:
CHAINCODE=person # keep this value the same
CHANNEL=public # keep this value the same
IDENTITYID=gov # keep this value the same
IDENTITY=gov # keep this value the same
IDENTITYORG=<organization> # This is the same organization value you got before
KEYSTORE=../config # keep this value the same
NETWORKPROFILE=../config/networkprofile.yaml # keep this value the same
COUCHDBVIEW=public_person # keep this value the same
COUCHDB_HOST=<server> # This is the same <server> value you got before
COUCHDB_PORT=<couchdb_port> # In your nodes environment click Details inside of the worldstate-peer1 box and copy the port number (a screenshot later)
COUCHDB_USER=<couchdb_username> # In your nodes environment click Details inside of the worldstate-peer1 box and copy the  user by clicking it (a screenshot later)
COUCHDB_PASSWORD=<couchdb_password> # In your nodes environment click Details inside of the worldstate-peer1 box and copy the password by clicking it (a screenshot later)
 Copy the whole config folder in your administrative package and paste it in the root of your server project, this will make the certificates and networkprofile accessible for the server application.
This project showcases also how to create views in CouchDB and query them directly, so we will need a View created in the server.
In the same worldstate box you saw before, click on Go to console and input the username and password you copied before.
Go to the database of your smart contract public_person, and add a new View:
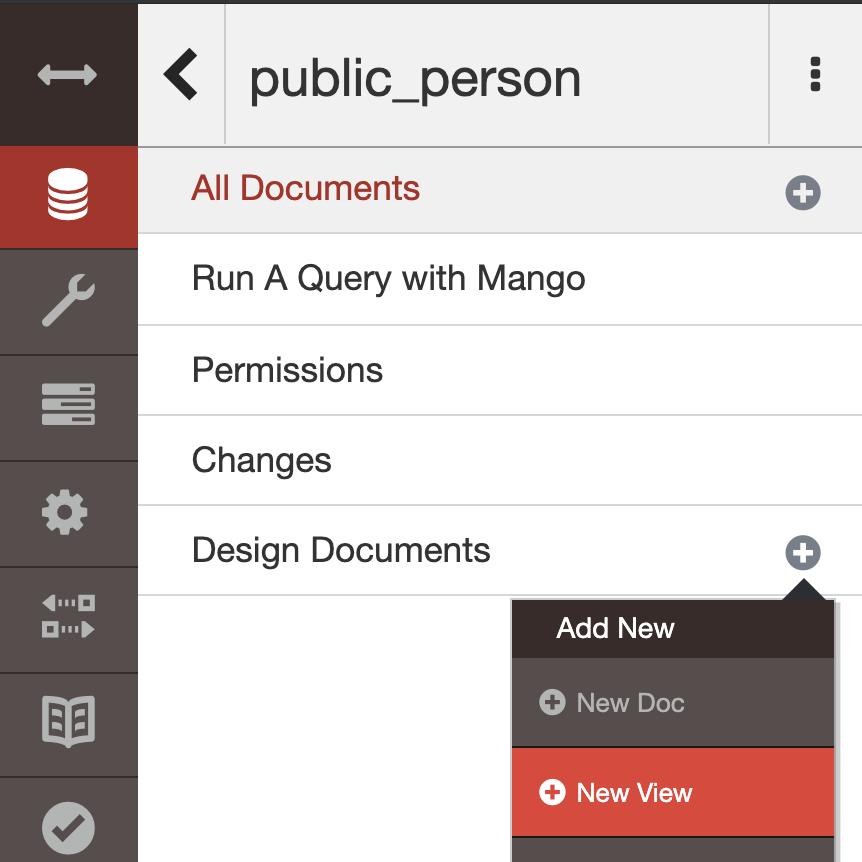
And input the following data:

You can copy and paste the values of the map function from your source code, head to ./views/person.json inside of the path views>all>map.
This will allow you to make queries directly to CouchDB through a precompiled view.
Now, it's finally time to start the server, you can do it by running in two separate console windows:
# For the front end
npx lerna run start --scope frontend --stream
# For the server
npx lerna run start --scope server --stream
Head to http://localhost:4200 and create persons and assign attributes!
A few rules to consider from the source code logic:
- Only the identity gov can create people.
- Any organization can assign or read attributes of people.

Congratulations! 🎉 you have successfully created a Blockchain network with Forma and deployed your first application.